Prerequisites
To complete this guide you will need an OpenAPI key which will be used for authentication. If you don’t have an OpenAI account, you can sign up for one here. You also need to already have created an assistant in OpenAI, you can follow the guide on how to do it here, we recommend using the playground if you’re not quite familiar with the API yet. Take note of yourassistant_id as you will need it later.
We will be guiding in you in creating a simple flow that will answer questions from your customers with a handoff condition to send the conversation to a human agent if the question is too complex for the AI to answer.
Basic flow structure
A ChatGPT flow will have an specific structure, we hope to improve this in the future but for now you’ll need to follow the following structure: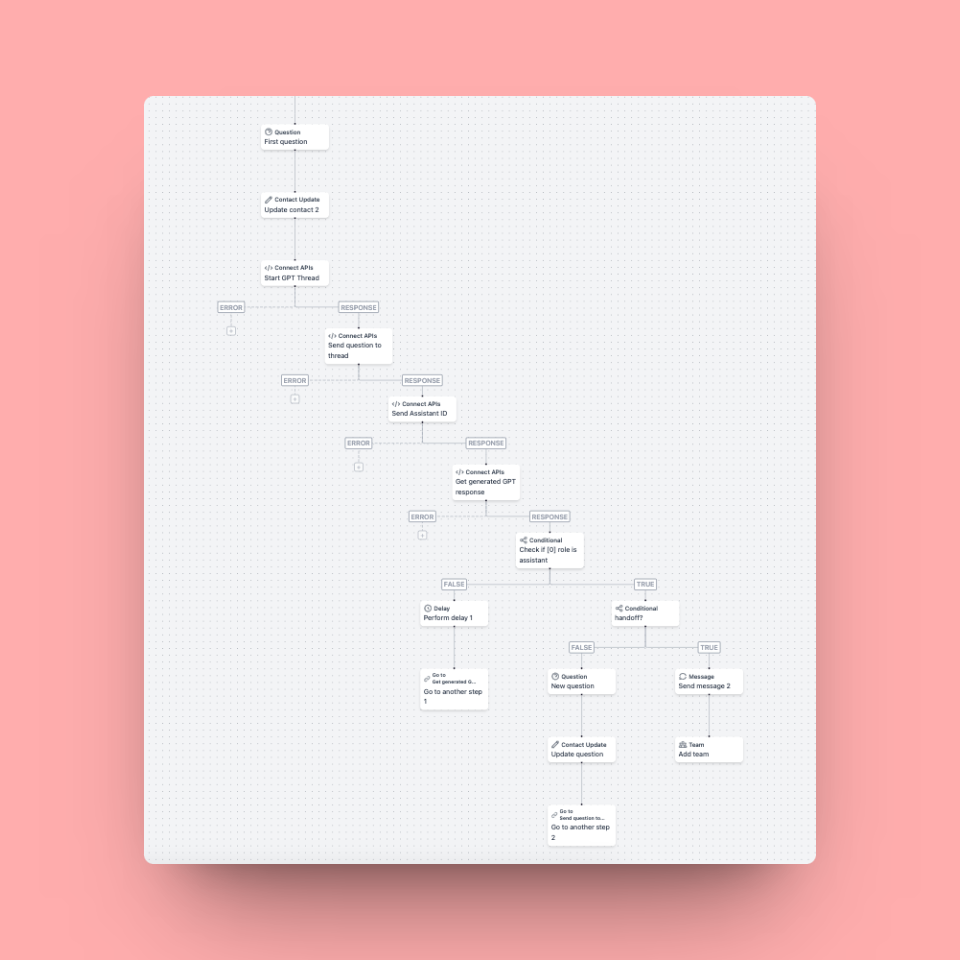 The flow begins with a basic question step, this step will be used to welcome the user and ask them what they need help with. After this we will use a contact update step to save the user’s answer inside a custom contact attribute which we’ll call
 gpt_response but you can call it whatever you want.
The next step is where we will begin to use OpenAPI, we’ll use the API step to send a POST request to https://api.openai.com/v1/threads with an empty JSON body and with the headers:
POST request to https://api.openai.com/v1/threads/\{\{step.Start GPT thread.response.id\}\}/messages with the following JSON body using the contact variable we saved earlier.
POST request to https://api.openai.com/v1/threads/\{\{step.Start GPT thread.response.id\}\}/runs with the body where assistant_id is the id of the assistant you’ve created.
GET request to https://api.openai.com/v1/threads/\{\{step.Start GPT thread.response.id\}\}/messages with an empty JSON body. We will then add a condition step with the following conditions:
step.Get generated GPT response is (equals) assistant and step.Get generated GPT response is empty No
Now on the branch false we will add a delay step of 10 seconds and then a Go to step which will go back to the API step that checks for the OpenAI response. On the branch true we will check to see if the response from OpenAI is a handoff which a predetermined message you should’ve specified in the assistant response, if it is we will show a message with the handoff response followed by an assign step, if it isn’t we will send another question step with the response from the OpenAI bot, we will add another contact update step to save the response from the user on the same custom attribute we used before and we will use the Go to step to go back to the API step that sends the user’s response to OpenAI. Rinse and repeat and you’re done.